How to Change the Default Terminal Shell on Mac

Did you know that you can change the shell that you use in Terminal on your Mac? Learn how in this guide.
When you use Terminal on your Mac, it will use a default shell. There’s no reason why you have to stick with that default, however. If you’re a fan of a different shell that offers useful features that aren’t available in the default shell, you can opt to change to your preferred shell instead.
Doing so is easy to do—you can change it just for the current sessions or change the default login shell. If you’re ready to swap bash for zsh, or zsh for dash, then here’s how to change the default Terminal shell on Mac.
What is a Shell?
A shell is a program that helps you interact with your computer’s operating system. The shell interprets the commands that you type in a Terminal window. Although Mac computers have default shells, you can choose to use a different shell.
For Mac computers, the default shell was always bash (Bourne-Again shell) up until the release of macOS Catalina, when it was replaced with zsh as the default.
However, zsh is only used for new user accounts. If you upgraded your Mac or transferred to your new Mac from a backup, you may still be using bash, even if you are running macOS Catalina or later.
Each shell has unique features, and some may have useful features that are missing from your current shell. For example, zsh provides autocompletion and autocorrection features that are not available in bash.
How To Tell Which Shell Your Mac is Using
If you want to know which shell you are using on your Mac, you can do so in the Terminal window.
There are a couple of ways to do so—one method is simple, but it doesn’t work for every shell out there. The other is a bit of a fudge, but should work no matter what shell you’re using.
To tell which shell your Mac is using:
- Open a Terminal window.
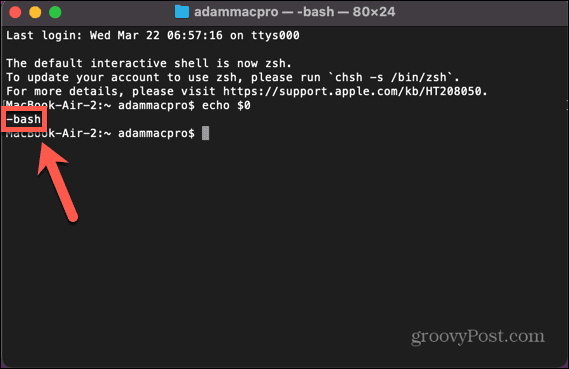
- Type the following command and press Enter:
echo $0
- You’ll see the current shell you’re using.

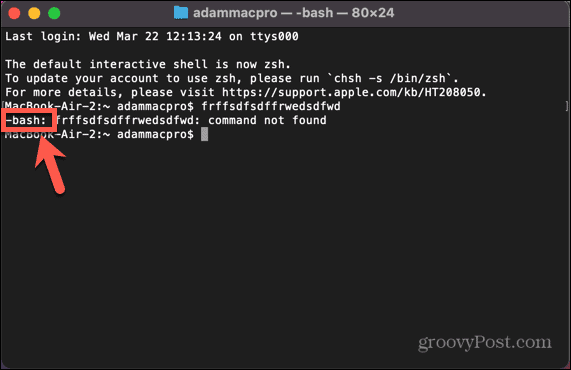
- If this method doesn’t work, try entering a nonsense command. To ensure you don’t enter a genuine command by mistake, type a fairly long string of random letters.
- The command will not be found, and the shell that you’re using will be listed before the command.

How to Change Your Default Shell in System Settings
You can change the default shell used by your Mac through the System Settings menu. This allows you to choose from a selection of shell options.
To change your default shell in System Settings:
- Click the Apple icon.

- Select System Settings.

- In the left-hand menu, click Users & Groups.

- Hold down Alt and right-click your username.
- Click Advanced Options.

- Enter your password.
- Under Login Shell, click the drop-down showing your current shell.

- Select from one of the options.

- If you have installed alternative shells, click Choose and navigate to the location of your shell.
- Click OK and your default shell will be set. This is the shell that will be used every time you log in to your user account.


How to Change Your Default Shell in Terminal
If you want to change the default shell, you can do so directly in Terminal. Enter one command, and the default shell will be changed to the shell of your choosing. You’ll need to know the path of the shell that you want to change to; the list can be found through the system settings, as explained in the section above.
To change your default shell in Terminal:
- Open a Terminal window.
- Type the following:
chsh -s
- Enter the path of your shell. If you are unsure of the correct path, you can see the list of options in the screenshot for step 8 in the section above. For example, to change to zsh, the full command would be:
chsh -s /bin/zsh
- Press Enter.
If you use one of the methods above to see what shell you are running, you will notice that the shell hasn’t changed. This is because your change won’t take effect until you close and reopen the Terminal. Once you do so, you should find that Terminal has switched to your shell of choice.
How to Change the Shell Without Changing the Default
What if you only want to use a specific shell for your current Terminal session, but want to keep the default shell as it is? Rather than changing your default shell back and forth, you can change the shell that Terminal is using in the Terminal settings.
To change the shell without changing the default:
- Open Terminal.
- Click the Terminal menu.

- Select Settings.

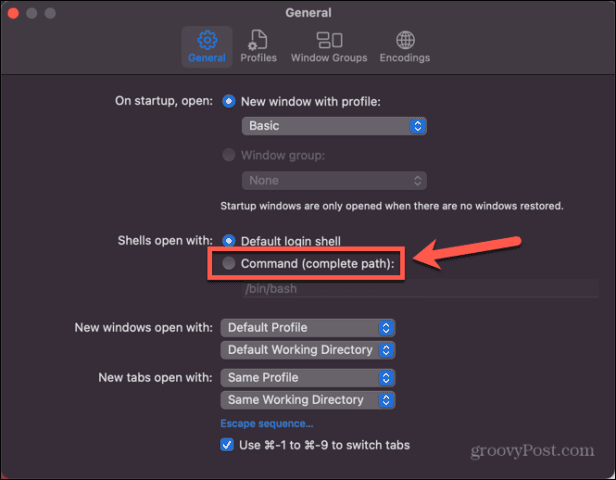
- In the General tab, under Shells Open With click Command (Complete Path).

- Enter the path of the shell you want to use. You can see the list of paths in the screenshot for step 8 in the section before last.
- Close the settings window, and then close Terminal.
- Relaunch Terminal—it will use the shell you selected.
- If you want to revert to the default login shell, repeat steps 1-3 and select Default Login Shell.


Managing Your Terminal Settings on macOS
Learning how to change the default Terminal shell on Mac allows you to use your favorite shell rather than having to stick with the default. There are plenty of other ways that you can set up your Mac to be more to your liking.
If you’re constantly using two apps at once, you can learn how to use split screen on Mac. If you need to work with more than two apps, you can learn how to use Stage Manager on Mac to make multitasking easier. And if you want to get the most out of your screen real estate, you can learn how to change screen resolution on Mac.