Simple Microsoft Outlook Email Rules You’ll Appreciate

Keep your inbox organized and save some time. Here are some Outlook rules you can set up to automatically move emails, flag them, and more.
Microsoft Outlook has as many terrific features as it does useful ones for composing emails and organizing your inbox. For instance, you can make important emails stand out and create automatic replies like when you’re out of the office.
Another great feature is the ability to set up rules. You can apply rules to incoming and outgoing emails that help you get organized, follow up, or stay up to date on your messages. And it’s all done automatically after the initial set up. Here a few common Outlook rules that you’ll appreciate because they’ll save you tons of time.
Setting up Rules in Outlook
For each of the rules below, you’ll start in the same spot. So whether you plan to set up one rule or several, or edit rules in the future, here’s how to navigate to the Rules area in Outlook.
- Click File from the menu.
- If it’s not already selected, click the Info tab on the left.
- Scroll down the main part of the page and click Manage Rules & Alerts.
- Click the Email Rules tab at the top of the pop-up window.
- Select the email account you want to set up the rule for in the drop-down box if you have more than one.
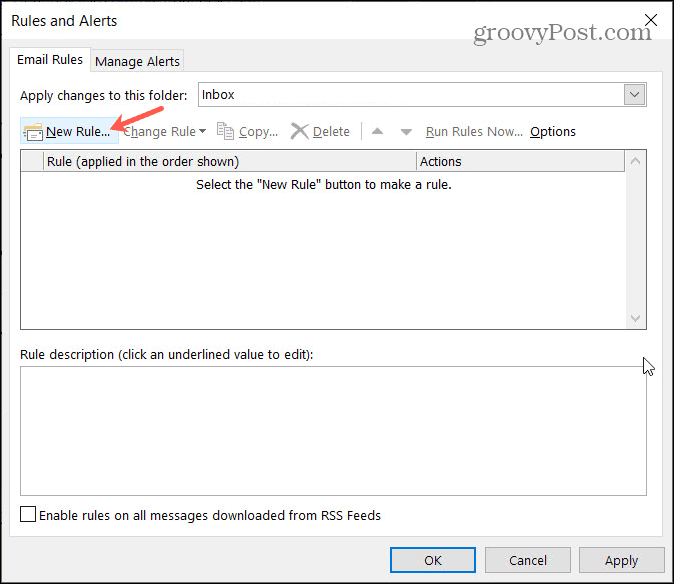

Click New Rule to open the Rules Wizard. This tool walks you through each step for setting up your rule. And it offers up some of the most common rules along with options for blank rules you create from scratch. Keep in mind that even if you pick a basic rule to start as we will below, you can tailor it to fit your needs.
After you set up a new rule, you can head back to this same area to edit, delete, run, or export rules.
Move Emails From People
Let’s say you have folders set up for people at work like clients or at home like family. You can have emails from certain people move automatically to the right folder. For our example, you can move emails from your parents, children, and siblings right into a Family folder.
- At the top of the Rules Wizard, select Move messages from someone to a folder.
- Click Next.
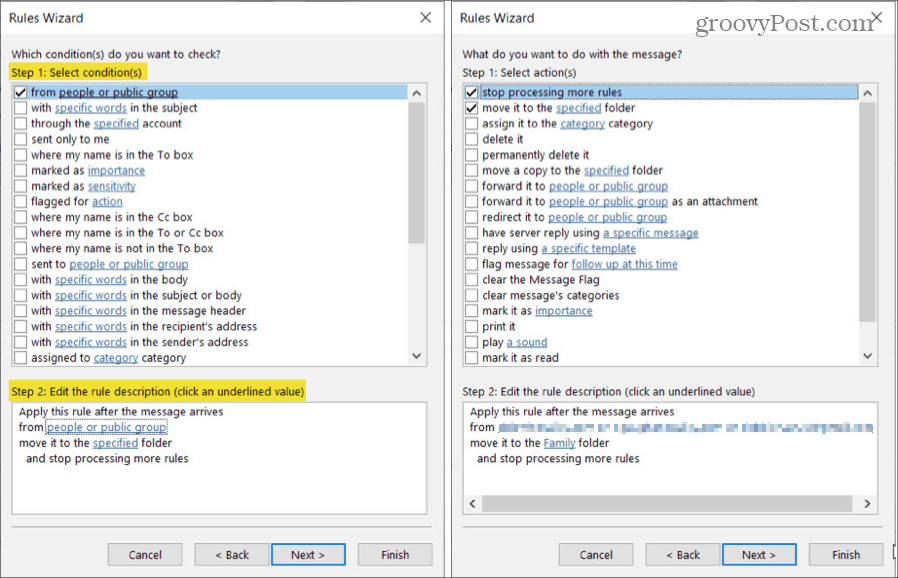
- In Rules Wizard Step 1: You’ll see all the available conditions you can apply to emails you want to move in addition to being from a certain person. When you check each one you want to use, it will populate in Rules Wizard Step 2. For our example, we’ll leave the first box checked for from people or public group.
- In Rules Wizard Step 2: Click people or public group to select the people in your family.
- Select your contacts from the list, enter a new email, or use the Advanced Find. Once you select the first one, click From at the bottom to add them. You can continue to add all people to this rule the same way.
- Click OK. You’ll then see those contacts in the Rules Wizard Step 2 area.
- In Rules Wizard Step 2: Click specified to choose the folder and click OK. You’ll now see that folder in Step 2.
- The next screen looks very similar to the previous one in the Rules Wizard but allows you to select more actions if you like.
- Click Next.

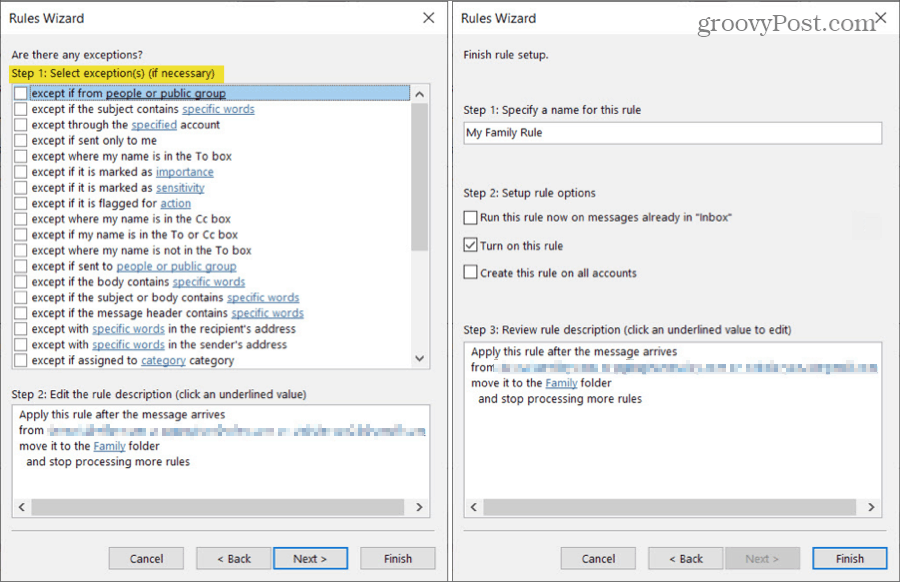
- On the next screen, you can set up Exceptions to your rule. This is handy if you want to exclude emails from the rule if they meet certain conditions. Check any that you want to apply.
- Click Next.
- Give your rule a name, check any setup options you want to apply, review the rule description, and click Finish. If you need to make changes, you can use the Back button at the bottom to revisit any screen.
- You’ll be back on the Rules and Alerts window. Click Apply and then OK to exit.

Time-Saving Tip: As you go through the process to create your rule, you can click the Finish button instead of Next at any time. So if you don’t plan to add more actions or include exceptions, you can skip those screens altogether.
Move Emails With Specific Words
Maybe you have a folder for travel-related emails, sales at stores, or projects at work. And these emails come from various people and companies. You can move emails based on specific words in the subject, body, or a combination of both.
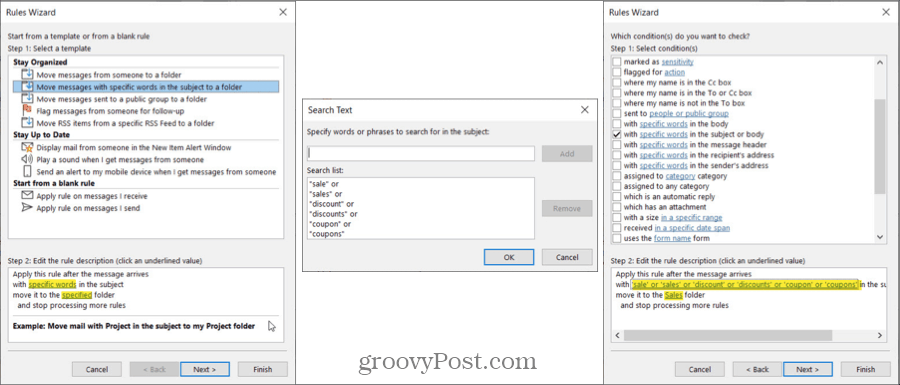
- At the top of the Rules Wizard, select Move messages with specific words in the subject to a folder.
- Click Next.
- In Rules Wizard Step 1: Check all conditions to apply to emails you want to move. For instance, you may want the words to appear in the subject and the body instead of just the subject.
- In Rules Wizard Step 2: Click specific words to enter each into the box and click Add. When your list is complete, click OK.
- In Rules Wizard Step 2: Click specified to choose the folder and click OK.
- If you would like to add more actions, exceptions, or check the setup options, you can continue with each screen by clicking Next. Alternatively, click Finish and your rule will be ready to go.

Time-Saving Tip: If you click Finish at any point, you won’t see the screen to give your rule a name, but you can do this on the Rules and Alerts screen. Select the rule, click Change Rule, and pick Rename Rule.
Flag Emails for Follow-Up
If you use Outlook for business, then you likely have emails that require you to follow up. Whether from your boss or a client, you can set this rule up easily.
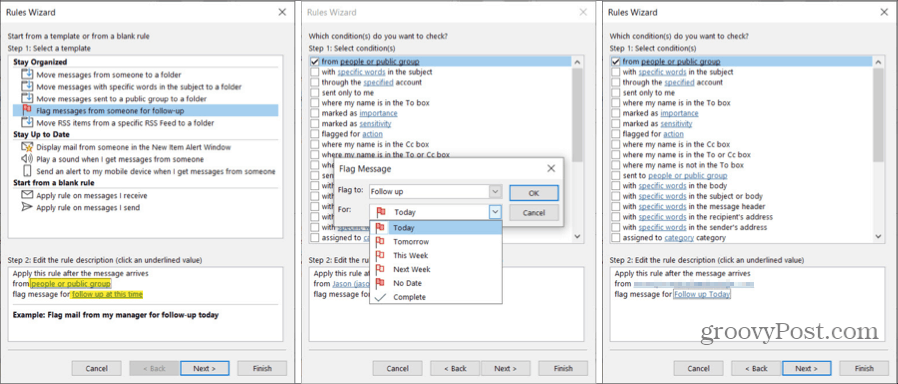
- At the top of the Rules Wizard, select Flag messages from someone for follow-up.
- Click Next.
- In Rules Wizard Step 1: Check all additional conditions to apply to emails you want to flag. Here, we’ll mark from people or public group.
- In Rules Wizard Step 2: Click people or public group to select the people.
- In Rules Wizard Step 2: Click follow up at this time, make your selections in the Flag to and For drop-down boxes, and click OK.
- If you would like to add more actions, exceptions, or options, you can continue with each screen by clicking Next. If not, click Finish.

Play a Sound When You Receive a Certain Email
One more Outlook rule that comes in super handy is for playing a sound. This triggers a particular sound alert when you get an email from a certain person, with a specific word, marked as important, and many other situations. We’ll set this up to play a sound for messages marked important.
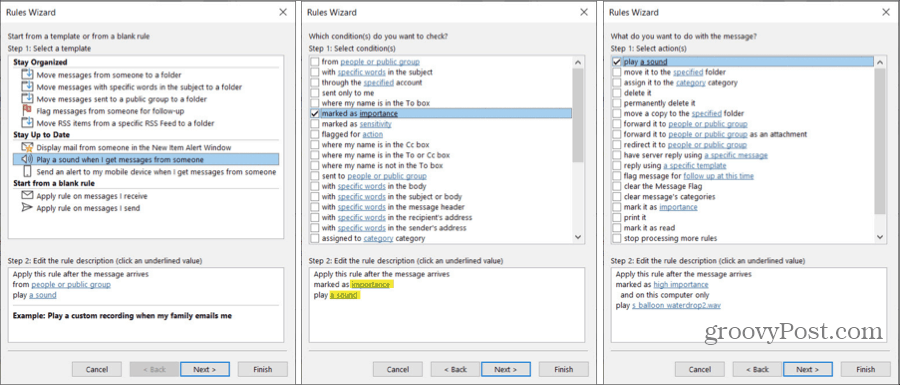
- At the top of the Rules Wizard, select Play a sound when I get messages from someone.
- Click Next.
- In Rules Wizard Step 1: Check all additional conditions to apply to emails you want to flag. For our example, we’ll check marked as importance.
- In Rules Wizard Step 2: Click importance to select the priority level and click OK.
- In Rules Wizard Step 2: Click a sound to locate the sound and click Open.
- Click Next to add more actions or exceptions. Or click Finish to wrap it up.

Outlook Rules Can Save You Time
Rather than moving emails or flagging them manually, and to make sure you’re alerted for certain messages, these Outlook rules can save you time and keep you up to date. Which ones do you plan to set up?
For more, take a look at how to automatically BCC yourself or others on emails you send using an Outlook rule.


