How to Split or Merge Table Cells in Microsoft Word

If you’re looking to manipulate your tables in Microsoft Word, you may want to split or merge cells together. Here’s how.
Microsoft Word is a great application for creating standard text documents, but it’s also very useful for other types of data, such as those presented in a table.
It’s a very easy process to create tables in Microsoft Word, but you may need to customize them. Thankfully, Word allows you to do this by merging and splitting table cells, letting you build your tables any way you want.
If you want to split or merge tables in Microsoft Word, here’s what you’ll need to know.
Why Merge Cells in Word?
When you create a table in Word, it’ll have the same number of rows in every column, and the same number of columns in every row.
You may want to have a single row that is the full width of your table at the top to use as the title of your table. Alternatively, you may want other combinations of rows and columns that you can’t create using the default table settings.
The simplest way to do this is to merge cells together. For example, in a 3×3 table, you can merge the three cells in the top row to make one full-width row, with a 2×3 grid beneath it.

Once you know how to merge cells, it allows you to get a lot more creative when creating tables in Word.
Why Split Cells in Word?
The most obvious reason to split cells in Word is to undo any merging you have done previously, but you can split any existing cell into two.
If you no longer wish to have a single full-width cell at the top of your table, for example, then you could split those cells back up again. If you want to add one extra column to a single row of your table, you can split one of the cells in that row to do so.
Splitting cells allows you to play around with the design of your table until you’ve got it exactly how you want it.
How to Merge Cells in Word
Merging cells in Word is fairly simple to do, and there are a few ways you can do it.
Using the Merge Cells Button
To use the Merge Cells button, first find or create the table that you want to edit, then highlight those cells.
These cells must be adjacent, but you can select multiple cells both horizontally and vertically.

In the Layout menu, click the Merge Cells button.
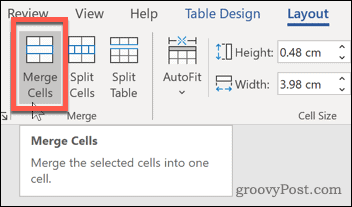
The cells you selected will now be merged together.

Using the Context Menu
You can also merge cells using the context menu, which appears when you right-click your table.
To do this, select the cells you want to merge, then right-click them once they’re highlighted. From the context menu that appears, click the Merge Cells option.
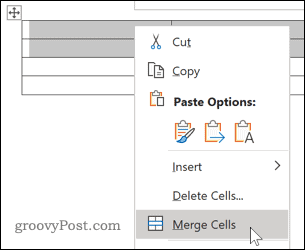
As with the method above, your cells will now appear merged after selecting this option.
How to Split Cells in a Microsoft Word Table
To split cells, you again have two options. You can use either method—both will split your table cells successfully.
Using the Split Cells Button
To use the Split Cells button on the ribbon bar, you’ll first need to select the cell (or merged cells) you wish to split.
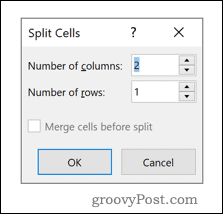
Once your cells are selected, click the Split Cells button in the Layout tab of the main ribbon bar.

This will bring up a dialog box, giving you further options to choose from.
Enter the values for the number of rows and columns that you want to split the cell (or cells) into, and then click OK to confirm your choice.
Your cells will now be split using the values you selected in the Split Cells dialog box.
Using the Context Menu
As with cell merging, you can also split cells by right-clicking your cells and using the context menu that appears.
To do this, you’ll need to first select your cell or cells, then right-click. From the menu that appears, click the Split Cells option.
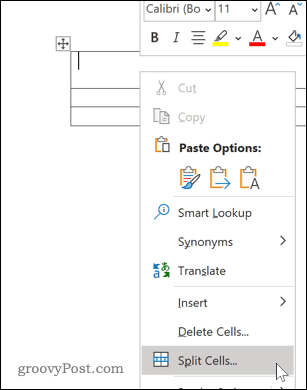
This will bring up the Split Cells dialog box. From here, you can set the number of new cells that will be created.
Enter the values for the number of rows and columns that you want to split the cell into, and then hit OK to confirm your choice.
Further Changes to Microsoft Word Tables
If you’re working with tables in Microsoft Word, there is plenty of additional things you can do to manipulate them into the perfect way to present your data.
You can learn how to sort tables alphabetically, use building blocks to create tables quickly, and even insert an Excel table into your Word to combine the features of both software into one document.