How to Set Up and Use Parental Controls on Nintendo Switch

Worried that your kids are gaming too much or playing unsuitable games? Learn how to set up and use parental controls on Nintendo Switch in this guide.
The Nintendo Switch is a hugely popular games console. The ability to play games either in handheld mode or on your TV makes it incredibly versatile, with access to hugely popular games such as The Legend of Zelda and Animal Crossing: New Horizons.
As a parent, however, you may want to consider using parental controls on a Nintendo Switch. You might decide to do this if you’re worried that your kids may be playing too much or playing games that aren’t age appropriate.
To set up and use parental controls on Nintendo Switch, follow the steps below.
What are Parental Controls on Nintendo Switch?
Nintendo Switch parental controls are built-in features that allow you to restrict how your child can use the gaming device. You can control the age range of the games that they can play, set time limits for how long they can play, choose who can make Nintendo eShop purchases, and even restrict their ability to post screenshots to social media.
Some of the parental control features can be set up directly on the console, but some of the more useful features such as setting time limits on play require you to download the Nintendo Switch Parental Controls app. You can link this app to your console and this allows you to take more control over restrictions.
How to Set Up Parental Controls on the Nintendo Switch Console
If you don’t want to use the Nintendo Switch Parental Control app, you can set up some parental controls directly on the console. There are some simple presets that allow you to quickly set up your parent controls. You can also opt to customize to your own specific settings.
To set up parental controls on the Switch console:
- Power on your Nintendo Switch.
- On the Home screen, select System Settings from the menu icons at the bottom of the screen.

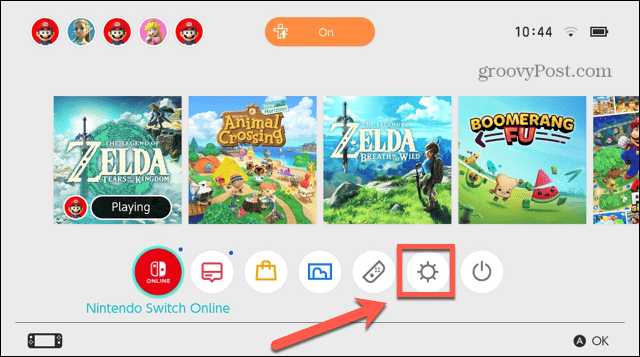
- In the left-hand menu, choose Parental Controls.

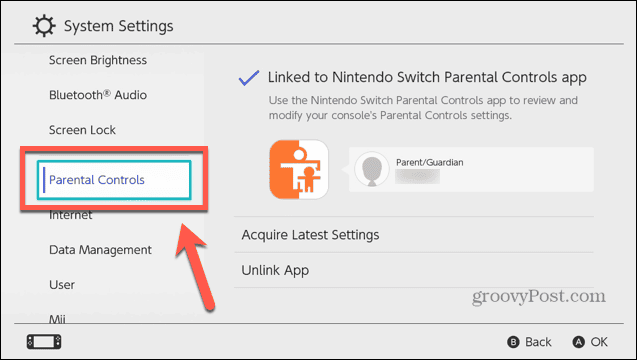
- Select Parental Control Settings.


- If you don’t want to use the smartphone app, press X or tap If You Don’t Have a Smart Device.


- Select Next to confirm you are happy to set up parental controls without a smart device.


- Click or tap Restriction Level.


- Select one of the options. Young Child excludes games above a rating of 8+, Child restricts games above 13+, and Teen restricts games above 17+.


- If you want more control over the settings, select Custom.


- You can now choose your own setting for Restricted Software, Content Rating System, Posting Screenshots, Free Communication, and VR Mode.


- Click or tap Next.


- Create a PIN before four and eight digits. You can use the joystick or press and hold + to enter your PIN using a keypad.


- Confirm your PIN and your parental controls will be set.


How to Delete Parental Controls on the Switch Console
If you set up parental controls on the console, you can delete them again to remove all restrictions.
To delete parental controls on the Switch console:
- Power on your Switch.
- On the Home screen, choose System Settings.


- Select Parental Controls.


- Click or tap Change Settings.


- Enter your PIN
- Tap Delete Settings or press X.


- Click or tap Delete to confirm.


- Your parental controls are removed.
How to Register the Nintendo Switch Parental Controls App
If you want to include further restrictions, such as limits on playing time, and bedtime alarms, as well as be able to check played games and time spent playing, then you’ll need to download the Nintendo Switch Parental Controls app. Once you’ve installed it, you can register it to your Nintendo Switch so that you can apply restrictions and track usage.
To register the Nintendo Switch Parental Controls app with your console:
- Download and install the Nintendo Switch Parental Controls app for iOS or Android.
- Power on your Nintendo Switch.
- On the Home screen, choose System Settings from the icons at the bottom of the screen.


- In the left-hand menu, select Parental Controls.


- Click or tap Parental Control Settings.


- Select If You’ve Already Downloaded the App.


- Open the Nintendo Switch Parental Controls app on your phone.
- Tap Next.


- You will see a six-digit registration code.

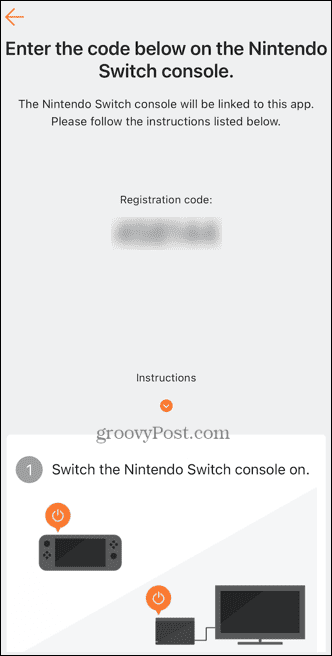
- Return to your Switch console and select Enter Registration Code.

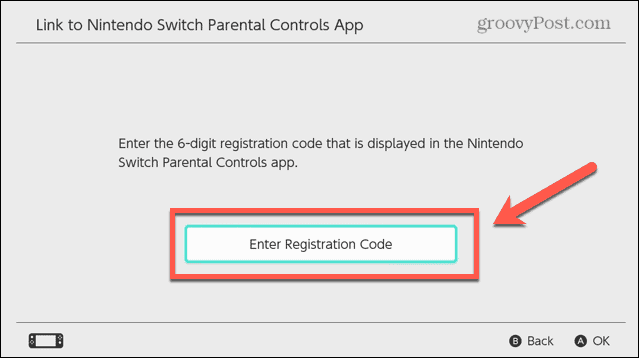
- Enter the code shown on your phone.
- Press OK or the + button.
- Confirm you want to link the app to your Nintendo account by pressing Link.


- Your Switch will now be linked to the app.
How to Set Up Parental Controls on the Nintendo Switch Parental Control App
Once you have registered the app to your console, you can start setting up parental controls. There are some preset options to allow you to quickly set up suitable parental controls, or you can choose your own custom settings.
To set up default parental controls on the Nintendo Switch Parental Controls app:
- Launch the Nintendo Switch Parental Controls app.
- At the bottom of the screen, tap the Settings icon.


- To set a limit on how long your child can play for, tap the Play Time Limit option.

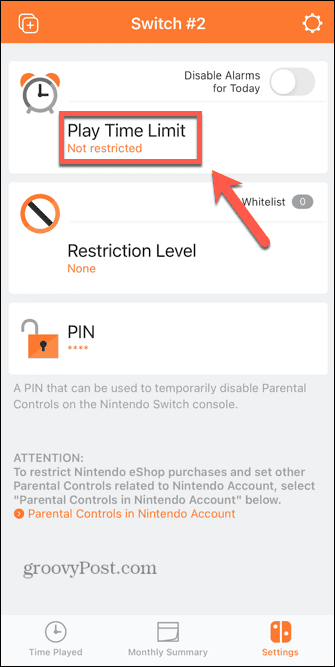
- Tap Not Restricted.


- Choose a maximum amount of time that they can play.


- When the time limit is reached, a notification will appear on the Switch. It won’t stop them from continuing to play the game, however.
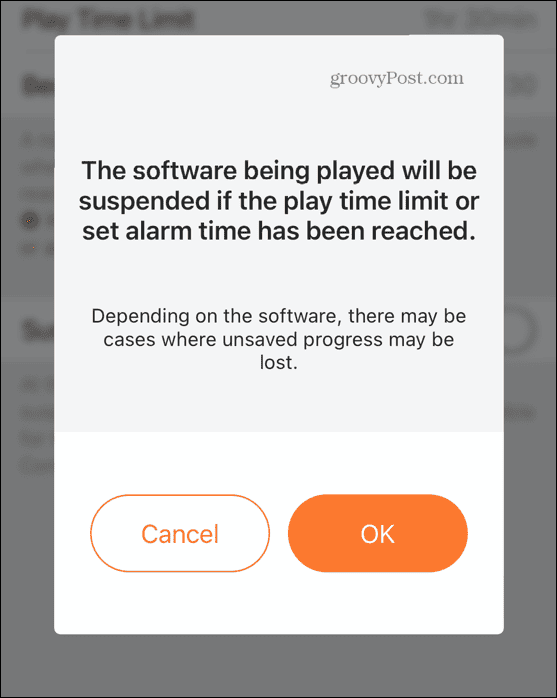
- If you want the Switch to suspend the software when the time limit is reached, toggle Suspend Software on.

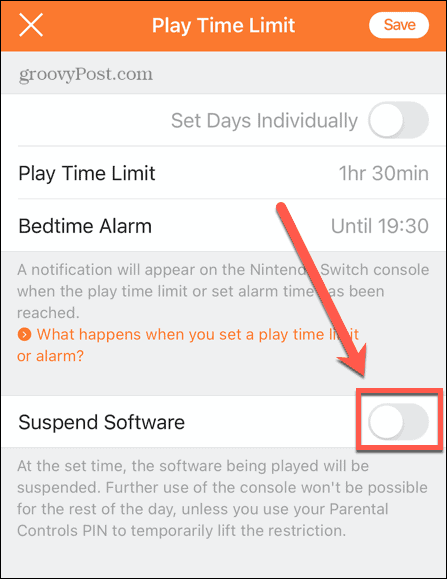
- You’ll see a warning informing you that suspending software may lose unsaved progress in games, which is something to consider before activating this feature.

- To add an alarm that will bring up a message on the switch when it’s time for bed, tap Bedtime Alarm.

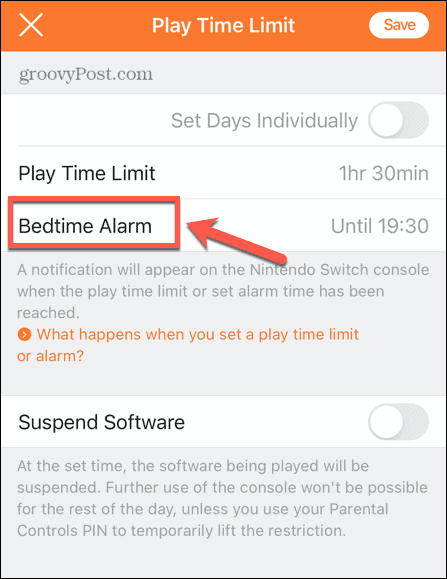
- Select the time you want the alarm to go off.


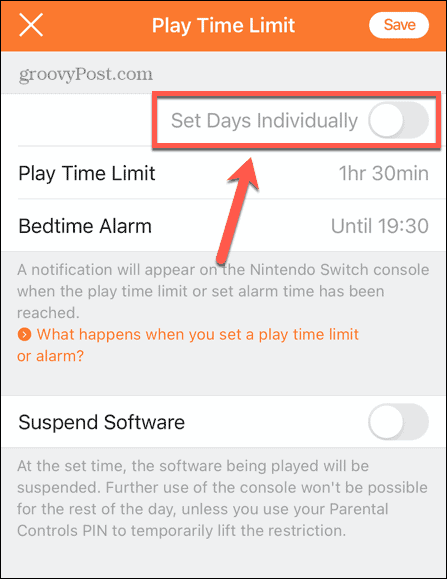
- If you want to customize the play limit or bedtime alarm settings, toggle Set Days Individually.

- Change the settings for each day to match your requirements.

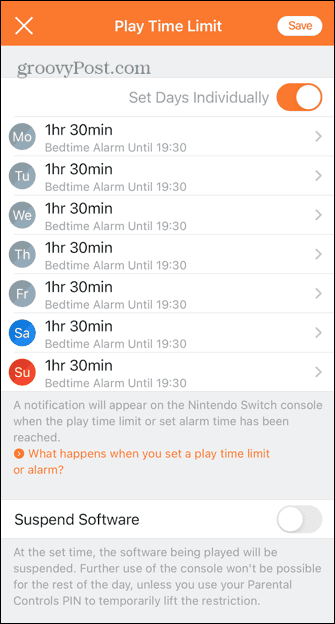
- Once you’re happy with your settings, tap Save.

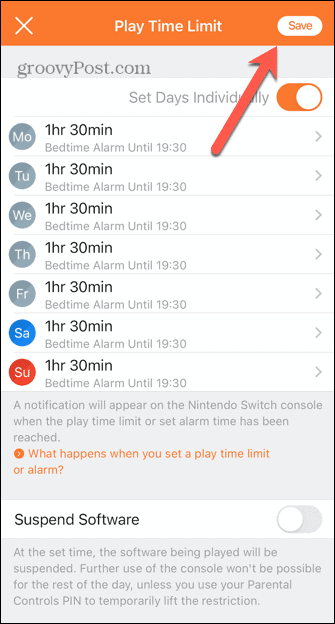
- To restrict access to certain ratings of games, tap Restriction Level.


- Choose from one of the preset options or select Custom.


- If you select Custom, you’ll be able to change the settings for Restricted Software, Posting Screenshots, Free Communication, and VR Mode.


- When you’ve made your selections, tap Save.


- To set the PIN required to lift restrictions, tap PIN.


- Enter a new pin between four and eight digits.


- Tap Save.


- Your parental controls are now set up.
How to Unlink the Nintendo Switch Parental Control App.
If the parental control settings are causing more trouble than they’re worth, you can choose to delete them, which will remove any restrictions you’ve set up.
To unlink and delete parental controls settings on Switch:
- Power on your Nintendo Switch.
- On the Home screen, choose System Settings.


- In the left-hand menu, select Parental Controls.


- Select Unlink app.


- Enter your PIN and select Unlink to confirm and your parental control settings are removed.
Get More Out of Your Switch
If you’re worried about your kids safety, you can keep a closer eye on their gameplay by using parental controls on your Nintendo Switch. There are plenty of other useful things to know if you’re a Switch owner, however.
You can learn how to connect a Switch to a TV without a dock if yours is lost or damaged. You might want to cancel Nintendo Online if you don’t feel like you’re getting your money’s worth.
And if things are going right, there are some fixes to try if your Switch won’t connect to your TV.
Leave a Reply
Leave a Reply


