Setup a Virtual Machine with Windows 10 Hyper-V

If you’re running Windows 10 Pro or Enterprise 64-bit edition, here we take a look at setting up a Virtual Machine using the built in Hyper-V technology.
With the release of Windows Server 2008, Microsoft’s network OS also provided its first virtualization utility called Hyper-V. Microsoft is not new to VM technology as it had previously provided solutions like Virtual PC and Virtual Server. The company has since developed a more homegrown solution and integrated it with the Windows platform. With the release of Windows 8 in 2012, Microsoft made Hyper-V available to the Windows client for the first time, eschewing its previous consumer-oriented efforts for a more robust solution. In this article, we take a look at using it.
Create a VM Using Windows 10 Hyper-V
Let’s take a look at setting up a Virtual Machine using the built-in Hyper-V technology. The benefits include the ability to run multiple operating systems at the same time as long as you have enough hardware resources. Personally, I decided to do this because I need to do some compatibility testing. Hyper-V is also an excellent way to try and test apps before using them in your primary production environment. Oh, and it’s a free hypervisor, so that makes leveraging it even better!
Pre-requisites
- 64-bit edition of Windows 10 Pro or Windows Enterprise. Hyper-V isn’t available in Windows 10 Home edition.
- Your CPU needs to support SLAT technology. To find out if it does, read our article on SLAT (Secondary Level Address Translation) extension that will help you determine if the PC can even run Hyper-V.
- Virtualization must be enabled in your computer’s BIOS or Firmware.
Enable Virtualization
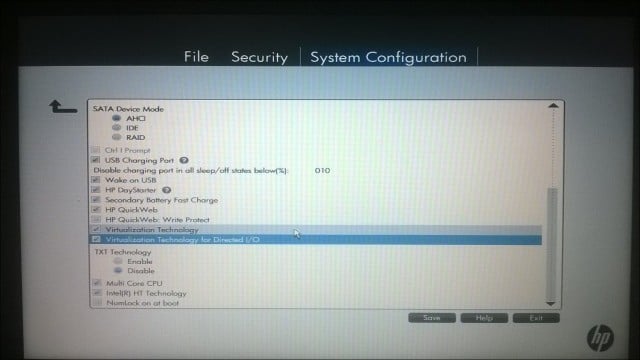
Restart the computer and enter BIOS setup (usually by hitting the F2, F10, or F12 key) on your keyboard before the computer loads the Windows operating system. This process might vary according to the brand, so consult your computer’s manual for instructions on how to load the BIOS. On my Computer, I had to hit the F10 key, select my language, select Security > System Configuration and enable the following:
- Virtualization Technology (VTx)
- Virtualization Technology Directed I/O (VTd)
- Search virtualization setting in BIOS and enable the setting
- Save BIOS settings (usually F10)
- Power off the computer, wait for a few seconds, and start the computer

Setting Up Hyper-V
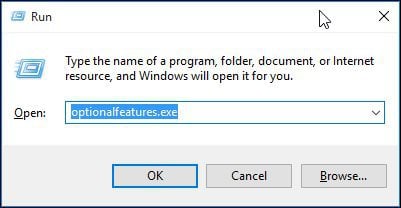
Press Windows key+R and type: optionalfeatures.exe hit Enter.

This action will open Turn Windows features on or off. Once it has loaded all the features, check off all the options for Hyper-V and click OK.


Then wait while Windows installs and configures Hyper-V. You will be prompted to restart to confirm changes. Windows will go through a series of restarts and configure your system.


Launch Hyper-V Manager and Create a VM
Next, you’ll need to open the hidden quick access menu by hitting Windows key+X and then go to Control Panel > Administrative Tools > Hyper-V Manager.


In the left pane of the Hyper-V Manager, select your machine name. This selection will enable the actions pane on the right.
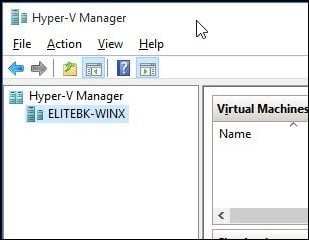

Under the Actions pane click New > Virtual Machine.


This will start the Create New Virtual Machine wizard. Click Next and follow the on-screen instructions.
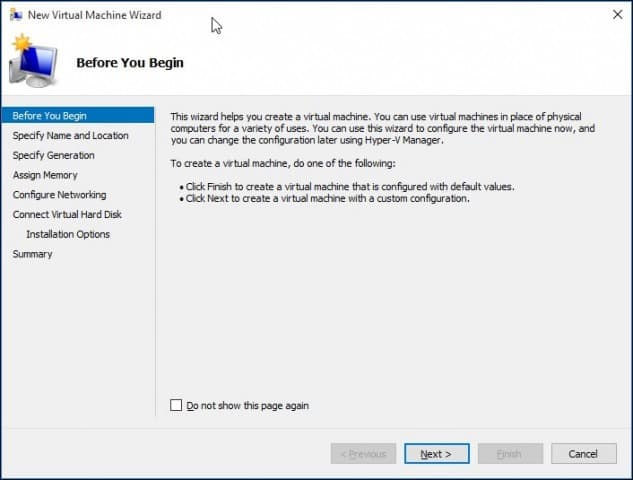

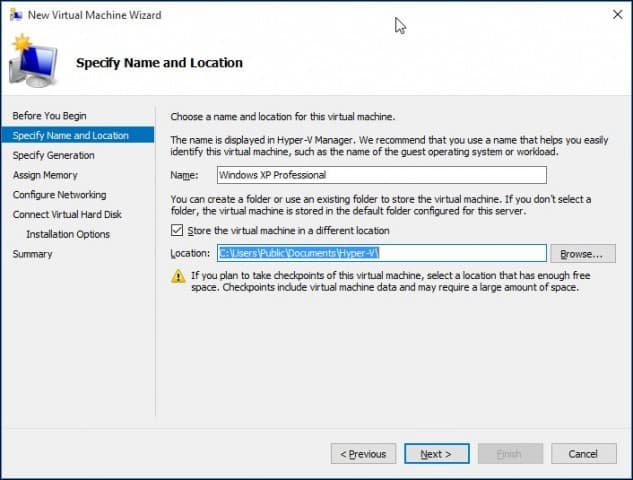
I can give my Virtual Machine a name and specify its location where I want it stored. So if you have additional partitions or a drive, then you can browse and save it there.

Choose the type of generation you would prefer to use. If you are basing your needs around legacy or older applications, go with Generation 1.


Choose how much memory you would like to give the virtual machine. This choice will be dependent on how much you have available. The more, the better. For my purposes, I will be doing application testing, so this should be enough for the operating system in addition to the applications I will be testing. If you have limited physical RAM installed, 2 GB or less, uncheck Use Dynamic Memory for this virtual machine.


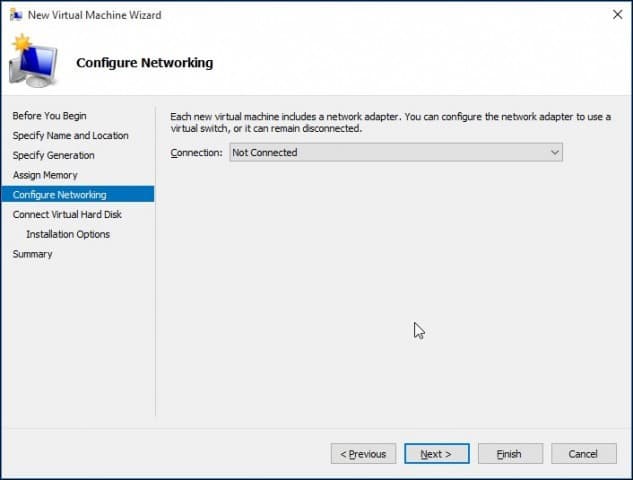
If you see a similar screen shown below, click Next to continue. You can always configure your Network settings after.

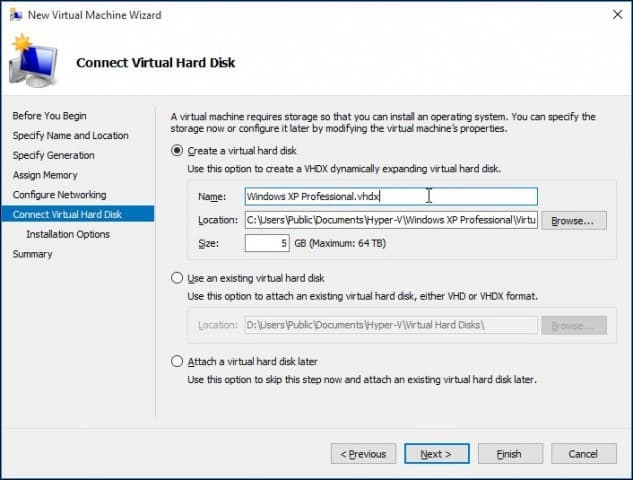
Configure your Virtual Hard disk where you will install the operating system. You can make quick changes here such as the location where it will be stored along with the amount of space you would like to give the Virtual machine. Here you can see – I have given the virtual machine 5 GBs of disk space. You can also choose an existing Virtual hard disk if you already have one.

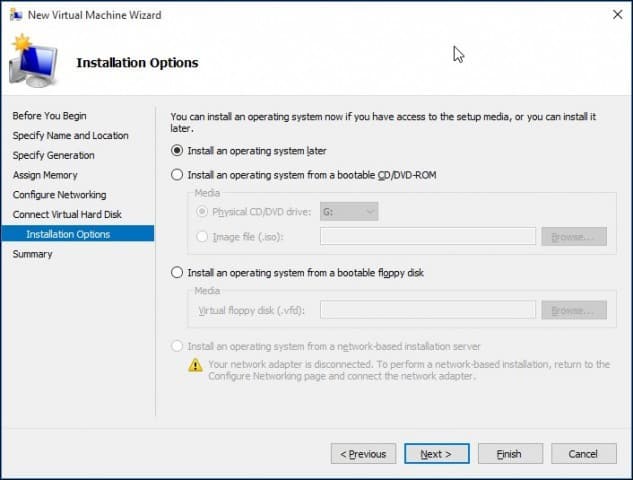
Below you can choose the option to designate the install media or its location or select the option to do so later. I will opt to do so later.

Review your options. You can click Previous and make any necessary changes. Once you are satisfied, click Finish.


Installing the Operating System
For this article, I will be installing Windows XP Professional. You have a wide choice of operating systems to choose from, which include other versions of Windows and some Linux distributions.
Select Install media
For this article, I will be using an ISO file image to install Windows from. It’s convenient and easy to do. You can install from a DVD or CD if you wish to do so. In the right pane under your Virtual Machine name, click Settings.
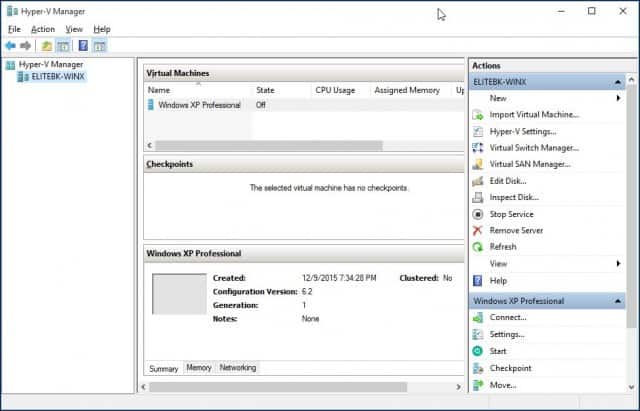

Select the DVD Drive menu in the Hardware tree. Choose whether you will be installing from a DVD drive if your system has one that is available or browse to an available ISO, which is what I will be using.


Click Start or double-click the Virtual Machine itself under the list of VMs to open the instance. This will start the Virtual Machine Manager. Follow the on-screen instructions to install your favorite operating system as you normally would on physical hardware.
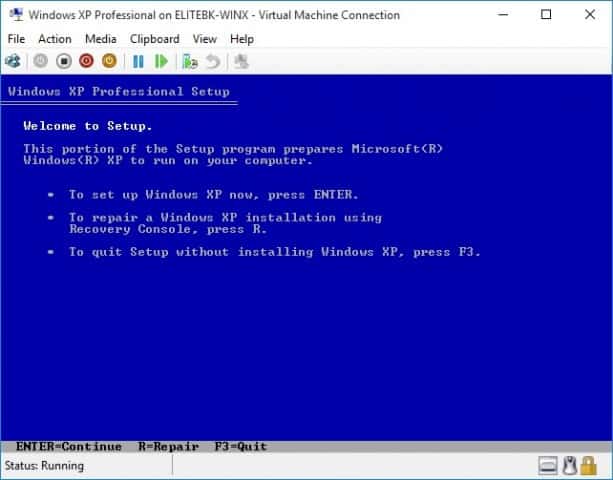

When setup is complete, you should have a successful setup that you can use for testing.
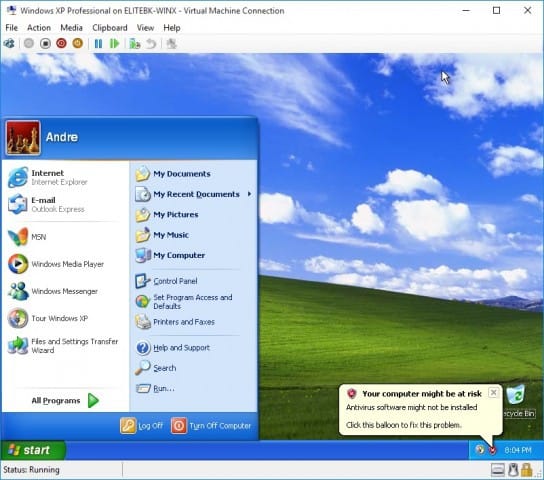

Installing an OS on a VM using Windows 10’s built-in Hyper-V is easy as doing it in other VM programs like VirtualBox or VMware. The beautiful thing about this is, you don’t need to install the third-party software first, and as I mentioned earlier, it’s also free. Additionally, being a native app in the OS I believe provides performance enhancements as well as other features not available in the third-party solutions.
If you’re not on Windows 10 yet, read our article: How to Create a Virtual Machine Using Hyper-V in Windows 8.
42 Comments
Leave a Reply
Leave a Reply


G. C.
October 4, 2015 at 6:24 am
Hello, I followed your tutorial till the DVD configuration; in my left panel I see only SCSI devices and when I try to add one there is no “Physical DVD” option available! I’d like to add my real DVD unit to install my OS windows 10.
How to manage to get my DVD drive recognized?
Filip
November 8, 2015 at 7:52 am
You should use Generation 1 virtual machine.
G. C.
October 6, 2015 at 12:42 am
I’ve fixed now; I wonder what is the way to get a Windows 10 pro running as guest without to buy another license?
Walter Kraslawsky
January 9, 2016 at 9:27 pm
How did you solve the license problem? I can’t even afford a 180-day Windows Server 2012 license for studying for an MCSE on my home computer, so I am going with an Azure VM instead.
Andre Da Costa
January 18, 2016 at 10:54 am
The 180 Day Windows Server 2012 trial is free, all you need to do is register:
Try Windows Server 2012 R2 | TechNet Evaluation Center
https://www.microsoft.com/en-us/evalcenter/evaluate-windows-server-2012-r2
G. C.
January 18, 2016 at 11:06 am
I have joined the Microsoft Technet peview program where are available more than one build of Microsoft OSes.
Andre Da Costa
January 18, 2016 at 10:51 am
Microsoft does not penalize you as much as they did in the past. You could perform a keyless install of Windows 10 then use it to carry out your labs. Just won’t be able to perform some personalization of the OS.
Brian
November 6, 2015 at 12:00 pm
Andre, This article was super helpful. Awesome work! Thank you so much!
Jorge
November 29, 2015 at 2:06 pm
Great article…
I also see only SCSI Devices. Is it possible change generation? From Gen 2 to Gen 1?
Andre Da Costa
January 18, 2016 at 10:32 am
This is the only solution I could find regarding conversion from gen 2 to 1:
http://www.ms4u.info/2015/02/convert-generation-2-virtual-machine-to.html
Nathan
January 22, 2016 at 1:45 pm
Seriously?
Garry
January 23, 2016 at 7:50 am
I am having problems connecting to the network. I have a virtual switch built as external in the Hyper-V Manager, but the Virtual Machine I created does not connect once I set its network adapter to the switch. Additionally, my XP installation in the Virtual Machine has some “?” objects in the device manager. How is the network built in this situation?
Sven
January 27, 2016 at 7:06 pm
I have the same problem, no network even though my host (a Surface Pro 3) is connected and working fine. I tried the network connection settings of the vm but can’t this to work.
This is also blocking some other fine-tuning that is internet dependent.
(But besides, thank you for the above steps, they were super helpful!!)
David
January 27, 2016 at 7:28 pm
Thank you for this post but how can I configure a vNIC for my virtual box so I can get out to the internet with it.
Charles Krznaric
February 2, 2016 at 4:39 pm
I was able to setup windows xp pro using Hyper-V on Windows 10 a few days ago. Now I can’t seem to find it to start xp. I want to make a shortcut for the future.
Any suggestions would be appreciated,
Charles
Malcolm Peill
February 16, 2016 at 6:00 am
Can you suggest what my issue is, unable to install an operating system into the virtual machine?
Using the hyper-v manager I have been able to create a virtual machine, and selected “install operating system later”.
Following your instructions above to install the OS, I selected the DVD drive, then opted to select the relevant iso file from my pc (on a local second hard drive, the iso being for Linux Ubuntu).
I then start the vistual machine and get the message in the connection window:
1. SCSI DVD (0.1) The image’s hash and certificate are not allopwed (DB).
2. Network Adapter (00155D000902) DHCP failed.
3. SCSI Disk (0,0) No UEFI-compatible file system was found.
No operating system was loaded. Press a key to retry the boot sequence…
Note: Configuration changes may require the virtual machine to be reset.
Flubaroo
December 22, 2016 at 4:41 pm
You have to stop the virtual machine, go into the properties, and change secure boot to disable. By default Microsoft enforces a secure boot option that only allows microsoft secure software to be installed.
Garry
February 20, 2016 at 8:11 am
I have given up and deleted all my hyper-v material. Fortunately, I still have one Windows 7 machine where XP mode is free and works great. I also have install Win2000 on same machine. Microsoft has screwed us with Windows 10.
Finn
February 24, 2016 at 11:07 pm
I may be totally on the wrong page here.
But will this enable me to play old Win 98 games on my computer?
I have quite a few of the old Sierra on-line games and it’s quite a bother to set up Dosbox.
Thanks in advance
Blue Critter
February 25, 2016 at 7:20 pm
If I remember correctly, in Windows 7 Pro you could set up 3 VM running Win 7 with no additional licenses. Is this still available in Windows 10?
Michael Bowen
March 1, 2016 at 11:03 am
so if I understand what I saw if you simply want a fresh copy of the current OS (I am running Windows10) then I need a vhd file configured to point it too?
Linda
March 23, 2016 at 2:09 pm
i’m trying to put the hyper-v virtual machine on my new computer using windows 10. i’ve gotten as far as the settings window but i’m unable to add my windows xp virtual machine information in it. this is the program that i used on windows 7 for my virtual machine. HELP! we have 2 programs that can only run in XP.
Timon
March 24, 2016 at 11:24 pm
OK so have it working but how to get sound?
Petr Z.
March 30, 2016 at 2:01 pm
Ctrl+C/V
Hi, in Win8 it’s not able copy text/object with ctrl+c/v between host and main OS. In Win10 is this solved? For ex. VmWare have this function…
James
April 19, 2016 at 10:06 am
So I have my XP Pro VM up and running in Windows 10. Created my Virtual Network and Video options but I’m stuck on getting USB to work, mainly being able to redirect USB devices to be used the VM. I don’t even seen an option to redirect USB.
Dave Grant
May 10, 2016 at 5:05 pm
Hi Andre,
can I set up a virtual machine on my windows 10 pro system to utilize a separate installed hard drive that contains a cloned drive from my older windows 7 laptop that the motherboard had failed?
My system is a HP Envy 17t with Intel i7 HQ with 16 GB ram and two installed 2 TB hard disks (one containing the cloned 7 drive)
If yes could you please itemize the steps.
Thank you,
Dave
linda
June 28, 2016 at 1:12 am
Where do I find a dvd with the program I need for windows xp? I can’t go any further in the setup because I don’t have a dvd. I was able to download the xp program to my old computer. Where do I find the specific part I need to finish the virtual window?
Jeremy Kingston
July 15, 2016 at 9:27 am
Andre,
We have a Win10 i7 PC and via your instructions have installed HyperV and WinXP Virtual Mc. The only problemis that WinXP appears in a tiny window and changing screen resolution increases it slightly but still to only a fraction of full screen. ie still vitually unreadable. Is this a display driver issue. Any ideas?
Regards
J
Clark Kent
July 24, 2016 at 6:31 am
I also have the same problem, only windows 32bit appears on dropdown.
My laptop: Asus X556U 64Bit Wimdows 10 Home Edition. I just install again the virtual box with administration permission with repair option.
Then restart, when I check virtual box dropdown menu, windows 7 64 bit is available. And I was able to install windows 7 64 bit version. I hope it helps :-)
William
September 7, 2016 at 10:50 pm
Depending on how you have your network set up you may want to try Disabling the Virtual LAN ID as well – if one doesn’t work – the other will
Chris
December 8, 2016 at 10:18 am
Is there any special options to having windows hyperV do the virtual managing.I’m setting up a drive in virtual box and my only grump is I neez a way to get it to start on boot since this is hopefully my work around to having a HTPC through windows 10 with windows media center on windows 7.
Also question is if I use something like virtual box and decide to use hyperV is there a virtual file type to use to import?
Steve Krause
December 8, 2016 at 8:55 pm
Hyper-V on Windows 10 will allow you to start a machine when the HOST boots up. Host = Physical machine. Personally, I prefer Hyper-V over Virtual Box but that’s just me. Hyper-V gets it done, performs great and has all the features I need.
To migrate from VirtualBox to Hyper-V isn’t difficult. You just need to import the drives. Fairly straight forward.
umetnic
November 14, 2017 at 11:35 pm
Windows 10 will also not allow to run VirtualBox or Vmware together with Hyper-V. The moment You enable Hyper-V, VirtualBox and Vmware stop working with error ‘VT-x is not available’, etc…
Colin Peacock
January 14, 2017 at 5:13 pm
HI all, to answer those of you who cant get internet access inside the vm. Firstly configure the v-switch as an internal adaptor, this will create a vswitch on the host PC. Turn on internet sharing on the host pc’s phisical NIC and share it with the v-switch. Manually configure the v-switch and vm’s IPV4 settings as these do not have access to the DHCP of your router.
Host pc config.
ip : 192.168.0.2
subnet : 255.255.255.0 Class C subnet
gateway : 192.168.0.1 router IP
Vswitch config :
ip : 192.168.1.1
subnet : 255.255.0.0 Class B Subnet
gateway 192.168.0.2 IP of phisical host NIC
Dns : 8.8.8.8 and 4.4.4.4 googles public dns
any question please email
Colin Peacock
January 14, 2017 at 5:18 pm
Vm IP config
first VM
ip 192.168.1.2
subnet : 255.255.255.0
gateway : 192.168.1.1
second vm etc
first VM
ip 192.168.1.3
subnet : 255.255.255.0
gateway : 192.168.1.1
Garry C Petrie
January 15, 2017 at 1:08 pm
Is it a typo to configure the VM and host on different networks, i.e. 192.168.0.x and 192.168.1.x?
Juri
April 8, 2017 at 6:59 am
should be a typo (assuming there’s just one physical NIC built in). you’re either on a 192.168.0.x or on 192.168.1.x net, so is the VM
ahmed
April 27, 2017 at 4:13 am
any method to bypass virtualization requirement for installing hyper v just like virtual pc 2007 can be installled in windows 8.1 and 10 using some crack files.
my laptop does not support virtualization.
Secondly I want to boot my laptop from same VHD used for also virutal box. how to develop such VHD.
Christopher
April 25, 2018 at 1:22 pm
Andre, thank you for this blog post as well as your other post on setting up network access in VM
https://www.groovypost.com/howto/share-an-ethernet-or-wireless-network-connection-with-hyper-v-in-windows-10/
Clearly written and I’m proof the steps work. I’m looking forward to running a few needed legacy Windows 7 programs (for work).
Michael Rinkle
December 3, 2018 at 10:04 am
TL;DR Lolz, I can’t complete first step. I guess a VM can’t install/access HyperV if your already in a VM under unRAID.
John IL
March 25, 2019 at 3:26 am
I tried the Quick setup with Ubuntu 18.04LTS and it was nice to have it auto install and setup. Still the response was sort of clunky and the Window of the VM could not be resized so unless I ran it full screen the bottom of Windows was below Task bar. Fiddled with screen resolution for VM but did not help. Maybe running a Windows VM such as Win 7 or Win 8 would be better?? I did think it was better then VirtualBox but having run Windows OS on Mac’s with paid VM’s like Parallels I didn’t find Hyper V that polished. I guess its better then nothing and because its baked into Windows the convenience is there.
Clastr Cloud gaming
December 29, 2021 at 2:33 am
This is very useful if you’d like to provide your PC for multiple gamers at our platform. We will send this tutorial to our users in order to show them how they can do this. Thanks for sharing!
-Team Clastr