Avoid Targeted Advertising: Send Do Not Track (DNT) Requests in Microsoft Edge

If you want more privacy while browsing the internet, you can enable Do Not Track (DNT) requests in Microsoft Edge. Here’s how.
Have you wondered why ads for some products seem to follow you around the web? It occurs because of the nature of advertising network scripts that track and serve ads based on interests. To improve your online privacy Microsoft Edge on your PC, you can enable the Do Not Track (DNT) Requests feature.
The DNT feature was added to web browsers many years ago. DNT was first made available as an extension in Chrome and other browsers before being built into virtually all browsers.
Most browsers, including Edge, should have the DNT option enabled by default. However, you may want to double-check or turn off the setting in some situations. We’ll show you how to find it and turn it on or off in Microsoft Edge.
What Does Do Not Track (DNT) Do Exactly?
Many websites you visit collect data and serve ads based on your interests and demographics. For example, if you visit a website for a specific product, click on an ad, and then go to another site, an advertisement for that product may be displayed.
Or maybe you search for information about a product, service, or subject; you may later see advertisements for the item or ads related to your search displayed on other websites you visit.
When the DNT feature is enabled in Edge (and other browsers), it pings the websites you visit and says you don’t want targeted advertising or analytics. While this sounds great, it doesn’t change other privacy settings. So, it isn’t like InPrivate mode or Incognito mode in other browsers, which don’t save cookies or browsing and download history.
So, this feature may not always work as expected since most websites rely on advertising to generate income, and there is no obligation to honor a DNT request. Still, many websites do honor it. It may not be a “magic bullet” to avoid ad targeting, but it will likely still reduce the amount of targeted advertising you get online.
How to Enable Do Not Track in Microsoft Edge
Turning the Do Not Track feature on or off is straightforward using the following steps from the browser’s settings.
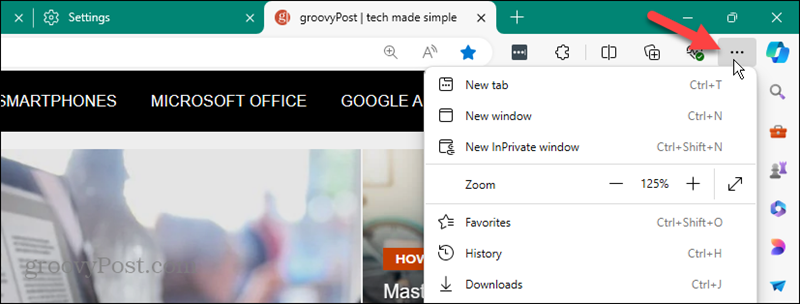
- Launch Microsoft Edge and click the Settings and more (three-dot) button in the top right corner.

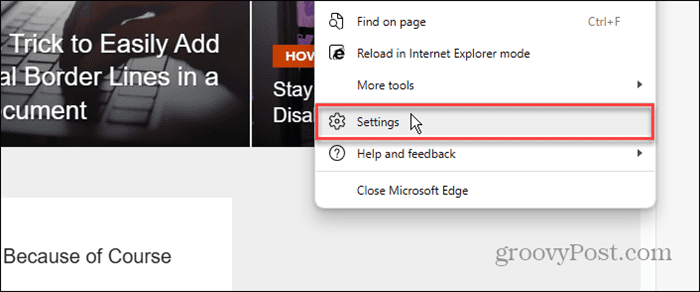
- Click Settings from the menu.

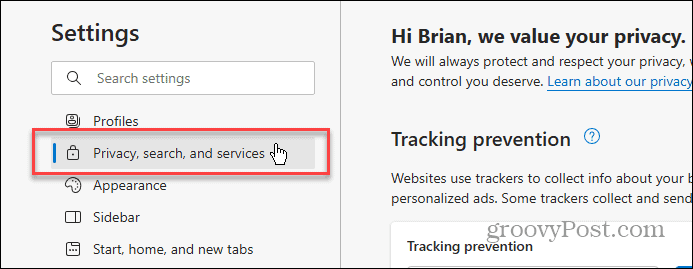
- Click the Privacy, search, and services option from the left panel.

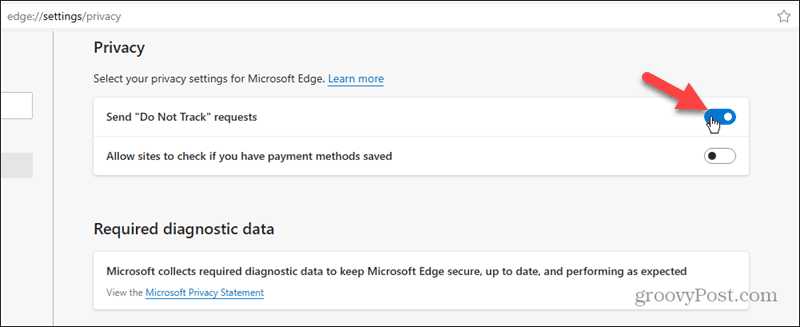
- Scroll down to the Privacy section on the right side and toggle the Send “Do Not Track” requests switch on or off based on your preference.

- If you enable DNT, click the Send Request button when the verification message appears.

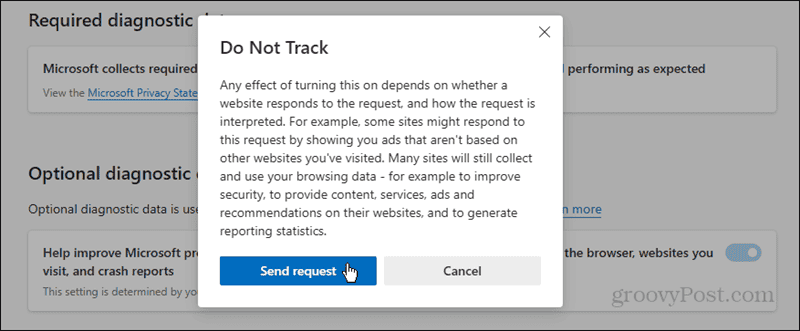
Enable Do Not Track (DNT) Requests to Improve Privacy in Microsoft Edge
Once you enable DNT, the browser will send a request to each site you visit to prevent advertisers from tracking you. This will allow you to have a bit more privacy while browsing the web. Remember that this doesn’t prevent ads; it just helps prevent ad targeting. For instance, a site may display a generic ad instead of something related.
It’s also important to note that this setting will sync. So, if you enable it in Edge on one PC, it will sync to the others you sign into with the same Microsoft account.
Leave a Reply
Leave a Reply


