How to Make All Cells the Same Size in Excel

Do you want your Excel spreadsheet to look a little neater? Here’s how to make all cells the same size in Excel.
Spreadsheets can be incredibly useful, but they can also quickly turn into a real mess. As you add more and more data and start resizing or moving rows and columns to fit your data, you may find that your spreadsheet starts to look chaotic and difficult to read. At this point, you may find that setting all of the cells in your Excel spreadsheet to the same size can make things a little clearer.
The good news is that there are several ways to quickly set the same height, width, or both for all of the cells in your document. Here’s how to make all cells the same size in Excel.
How to Make All Cells the Same Width in Excel With the Format Tools
If you want to quickly give all of the cells in your Excel spreadsheet the same width, you can do so using the Format tools. This allows you to set a specific width for your cells which will apply to all the cells that you select. To apply the width across your entire spreadsheet, you’ll need to select the whole document first.
- Select all the cells in your document by clicking the area in the top-left corner of your spreadsheet.

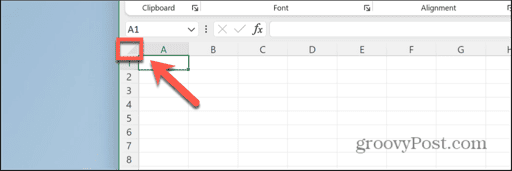
- Alternatively, use the keyboard shortcut Ctrl+A on Windows or Cmd+A on Mac to select all cells.
- In the Home ribbon, click the Format icon.


- Select Column Width.

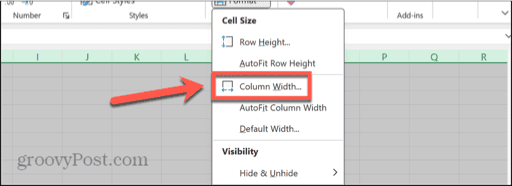
- Enter the row width you want to apply to all cells.


- Click OK and all the selected cells will have the width that you specified.
How to Make All Cells the Same Width in Excel With the Paint Format Tool
If there is a specific column of cells that is the ideal width for your needs, and you want to apply that same width across all the rest of the cells in your spreadsheet, you can use the Paint Format tool. This tool copies the formatting of selected cells and applies it across any other cells you select.
- Select the entire column that has the width you want to apply across all cells by clicking the column name.


- In the Home ribbon, click the Paint Format icon.


- Click the square in the top-left corner of your spreadsheet.


- The width of the selected column is applied across your entire spreadsheet.
How to Make All Cells the Same Height in Excel With the Format Tools
If you want to give all the cells in your spreadsheet the same height, you can do so using the Format tools. This allows you to specify a height that will be applied to all the cells that you select. By selecting the entire spreadsheet, you can give all the cells in your document the same height.
- Click the square in the top-left corner of your spreadsheet to select all cells.


- Alternatively, select all cells by pressing Ctrl+A on Windows or Cmd+A on Mac.
- In the Home ribbon, click the Format icon.


- Select Row Height.

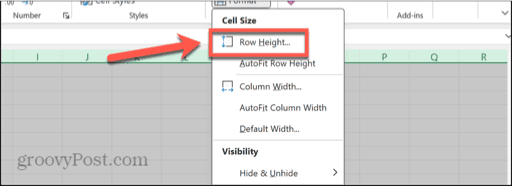
- Enter the row height you want to apply to all cells.


- Click OK and your specified width will be applied to all the selected cells.
How to Make All Cells the Same Height in Excel With the Paint Format Tool
If there is a specific row or rows in your spreadsheet that is the perfect height, and you want to apply that height to all the other rows in your spreadsheet, you can use the Paint Format tool to copy the formatting from this row and apply it to the rest of your document. This will make all the other rows match the height of your selected row.
- Select the row that you want to copy the height from by clicking the row number.


- In the Home ribbon, select the Paint Format icon.


- Click the area in the top-left corner of your spreadsheet to apply the formatting to all cells in your document.


- All rows in your spreadsheet will now have the same height as your selected row.
How to Make All Cells the Same Size Manually in Excel
Another way to apply the same height, width, or both to all of your cells in Excel is to select all of the cells in your document, or a range of cells, and then manually adjust the size of one of your cells. The same height and width will be applied to all of the selected cells in your document, allowing you to create the exact size you want without having to guess at the precise dimensions.
- Select all cells by clicking the area in the top-left of your spreadsheet.


- Alternatively, press Ctrl+A on Windows or Cmd+A on Mac to select all cells.
- Click and hold the right-hand border of one of your column headers and drag it to the left or right to change the width of the column.


- Release the cursor and the width will be applied to all of your other cells.
- Click and hold the bottom border of one of your row headers and drag up or down to resize the height of the row.


- Release the cursor and the height will be applied to all of your cells.
- All of the cells in your document will now have the same height and width.
How to Autofit All Cells in Excel
Excel also has another useful feature that will change the height or width of a cell to fit the contents of that cell. For example, if you have a long word in a cell, using Autofit will widen the cell so that the entire text fits within the cell. If a cell only contains a single digit, Autofit will reduce the size of the cell so that the single digit just fits inside it. This is a great way to make your spreadsheet as compact as possible without obscuring any of the data in it, although you may want to delete any blank rows first. You can apply Autofit across all your cells. This won’t make them all the same size; it will alter each row and column to fit the contents of the cells.
- Select all cells by clicking the area in the top-left of the spreadsheet.


- Alternatively, use the keyboard shortcut Ctrl+A on Windows or Cmd+A on Mac.
- In the Home ribbon, click the Format icon.


- To apply Autofit to the cell widths, select Auto-fit Column Width.

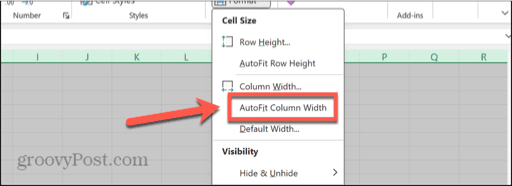
- The width of the cells automatically adjusts to fit the contents.
- You can also achieve the same effect by double-clicking one of the borders between the column headers.


- To apply Autofit to the cell heights, select Auto-fit Row Height.

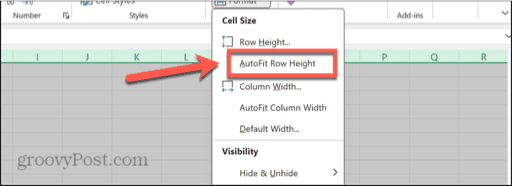
- The height of the cells automatically adjusts to fit the contents.
- You can also achieve the same effect by double-clicking one of the borders between the row headers.


Resizing Cells in Excel
Learning how to make all cells the same size in Excel can help create a spreadsheet that looks neater and can be easier to read. Using a uniform cell size may make your data more easily glanceable. Sometimes, however, you might prefer to use the Autofit options to remove any wasted space in cells. This can allow you to fit more data on the visible screen by removing unused white space.
Leave a Reply
Leave a Reply


